
How to install MotoVent Tiles
Installation and Advisory Notes
These notes refer to
MotoVent Rib Tiles 400 x 400 x 18mm Tiles
Mototile MotoVent tiles are suitable for indoor and outdoors. All tiles can be laid generally over any hard, clean and level surface. To get the best results for your new floor and to ensure a trouble free and long working life from the tiles we offer the following guidelines and advice. Many of the issues we mention are common to all PVC based tiles or floor paints but we have tried to minimise them in our designs.
Witness Marks and Surface finish
Please check the tiles before you commence laying, if the marking is unacceptable to you do not continue with installation. As we will not accept responsibility to replace or refund the cost of any goods after 5m2 or more.
Exposure to sunlight
Exposure to direct sunlight may lead to certain sections of the tiles heating up and expanding unevenly compared to the rest of the floor, resulting in the edges of the tiles curling up or causing distortion in neighboring tiles. For spaces featuring roller doors, expansive windows, skylights, or south-facing bays, it is highly advisable to securely adhere the tiles to prevent them from losing their intended shape.
Colour match, traceability and batch control
Each order is generally supplied fully from a single batch and we cannot guarantee perfect colour consistency, to a level of 100%, between batches. Should you wish to purchase additional tiles at a later date we cannot guarantee subsequent orders will be supplied from the same batch.
The batch number is clearly shown on your paperwork, which you should retain for reference.
Chemical Resistance
While PVC demonstrates strong resistance against a wide range of chemicals, its important to exercise caution, particularly with solvent-based chemicals, especially if employed as degreasers or thinners. Petrochemicals such as petrol and diesel may harm the elastomer within the tiles if left unattended for prolonged durations. Prompt cleanup is advised for fuel spillages to prevent potential damage.
Basic Installation & Advisory Notes requirements for all ranges
Sweep and / or vacuum through the floor so you can inspect it Fill any substantial holes or cracks in the floor and remove any protruding lumps and bumps If the floor is a tampered effect we would advise you to screed the floor to get the best level finish.
E.g. With a rapid cure self-levelling compound. The flatter and smoother the floor the better the end finish will be.
We typically discourage installing MotoVent tiles over carpet. All PVC based tiles expand and contract as temperatures change. At very low temperatures the tiles become harder, less flexible and subject to contraction while, at high temperatures, the tiles become softer, more flexible and subject to expansion. With this in mind we offer the following advice.
The minimum recommended temperature for installing the tiles is ± 15°C. Also, please be aware that ovens and catalytic converters emit heat which can cause expansion in the flooring.
You must always leave the tiles to acclimatise before laying them. Open up all the boxes, spread the tiles evenly still in the boxes over the area you will be laying and leave for a minimum of 24 hours before commencing fitting. This process also enables you to check tile quality and quantities before you begin fitting.
When fitting allow a minimum 5mm expansion gap between the floor and fixed points like walls, piers or around very heavy objects (e.g. racking, work benches etc.) to allow for any slight expansion or contraction due to temperature changes.
Tools required
All you will need to lay the tiles in most cases are: A white non-marking rubber mallet, which we can supply, an electrical saw, such as a table saw, circular saw, jigsaw or a sharp teeth wood handsaw, Tape measure and board to cut the tiles on.
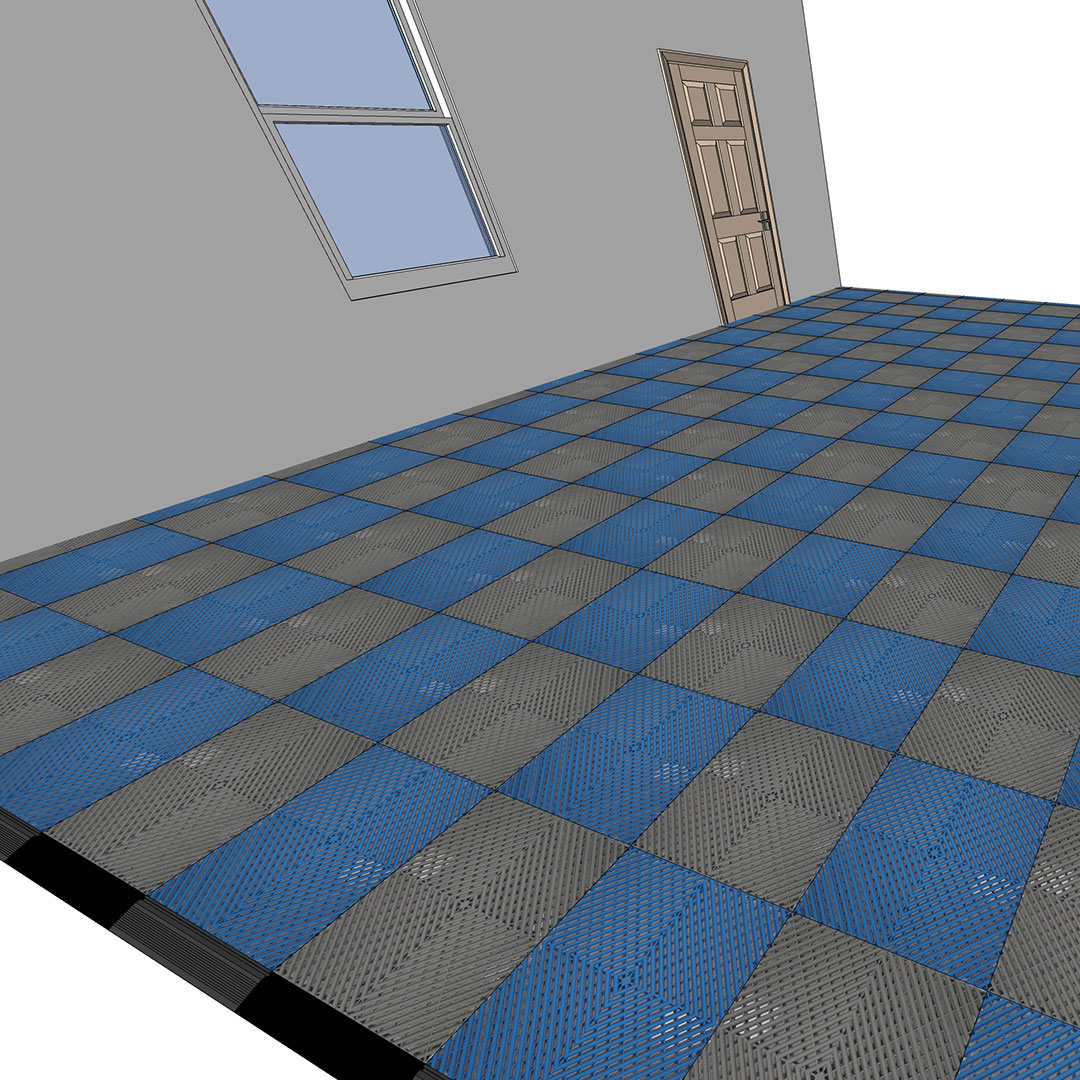
Floor Installation Tips MotoVent Tiles
There is no hard and fast rule to installing the MotoVent tiles and ramps. The advantage of installing the ramps at the end but before doing final cuts is that it then allows you to physically move the complete mat (2 people generally required) to align in case the walls are not square, please ensure that if you do need to move the mat that you keep the equal gap on the left and right hand side.
NOTE: This guide assumes you are fitting tile ramps in the garage entrance. It is strongly recommended that you do fit MotoVent ramps to protect the edges of the garage flooring, to stop movement of the tile mat and to prevent a trip hazard.
Please do not force the tiles together, you should hear a snapping sound when the tiles are joined together correctly using the non-marking rubber mallet, all you need to do is tap the joints together gently. If the MotoVent tiles are not locking together without a lot of force then they may not be properly aligned or you are doing something wrong.
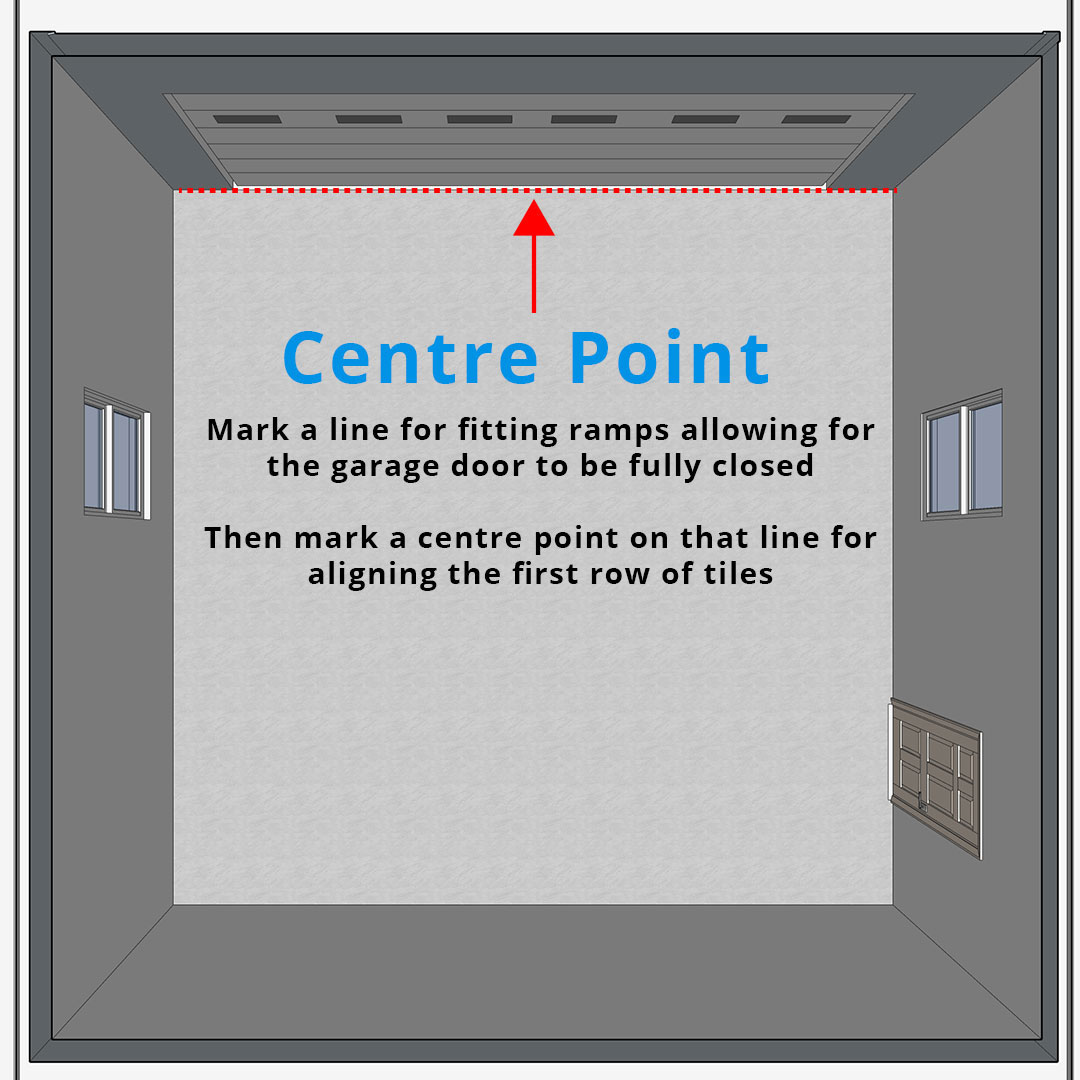
Stage 1 - Start at the door and draw a threshold line:
From inside the garage, with the door(s) closed, establish the line which the front of the tile ramps must not cross so that the door can be closed properly once the ramps are installed.
We will call this line the threshold line. Mark this line clearly for later use and re-open the door(s).
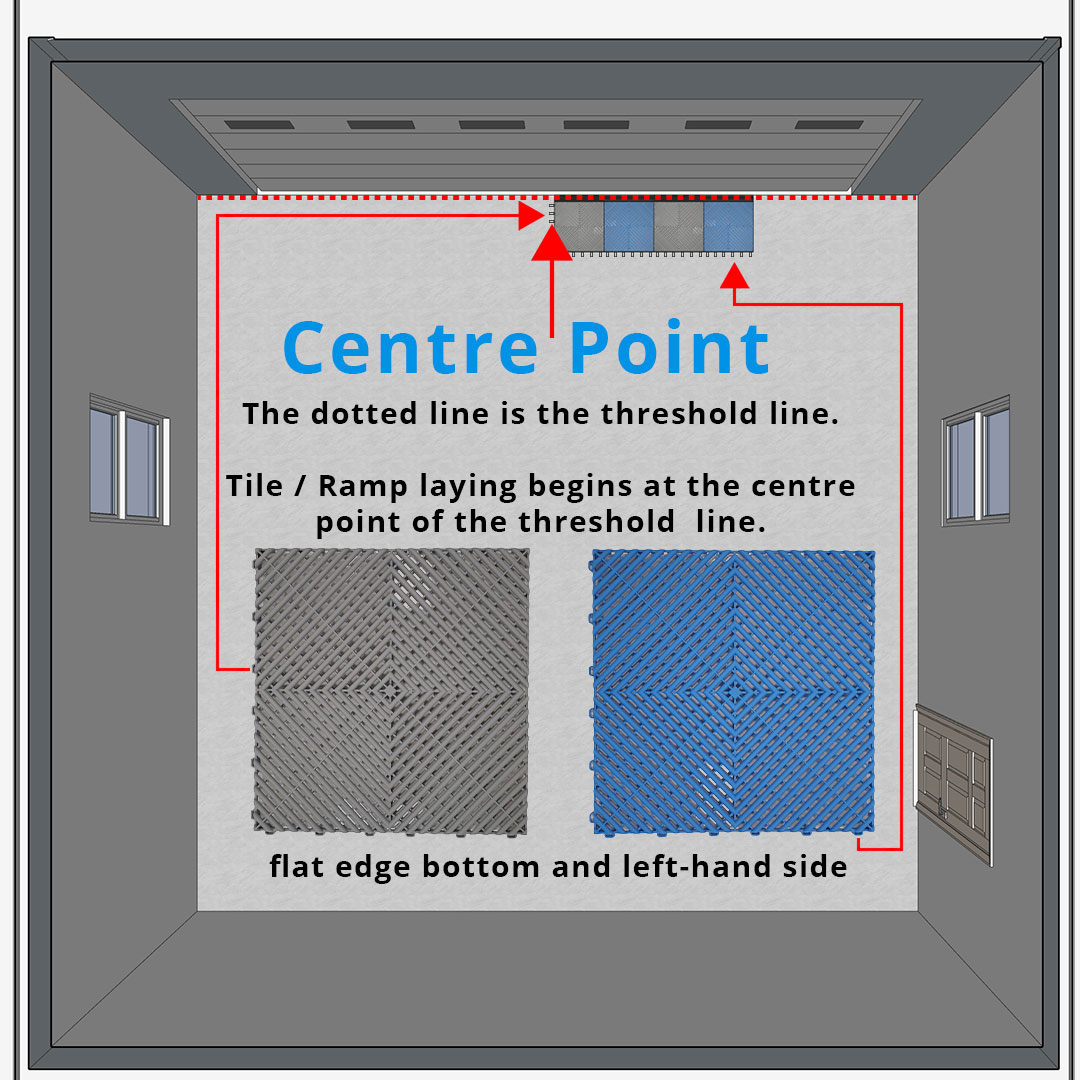
Stage 2 - Draw a tile ramp line, mark the centre & lay tiles
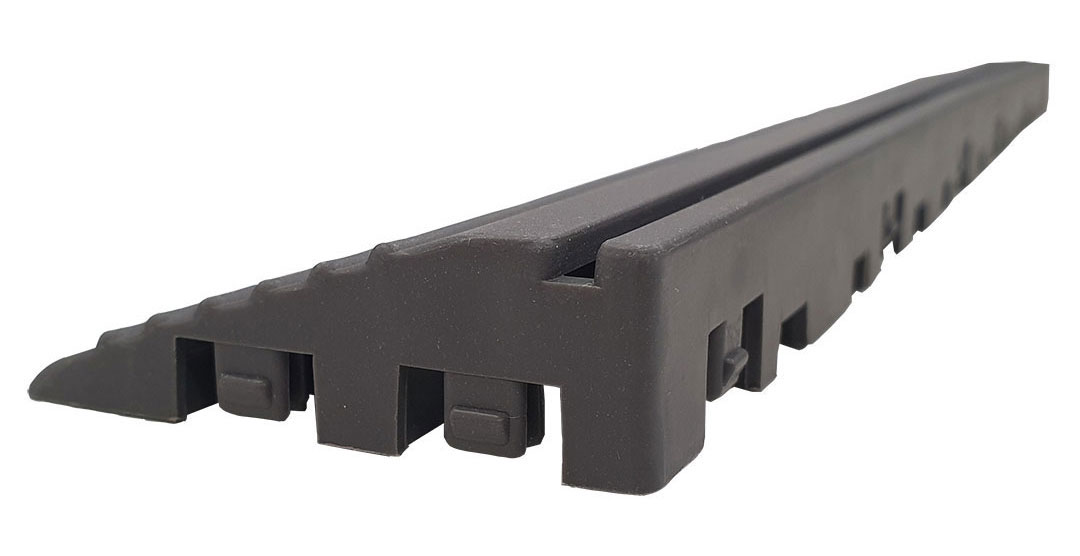
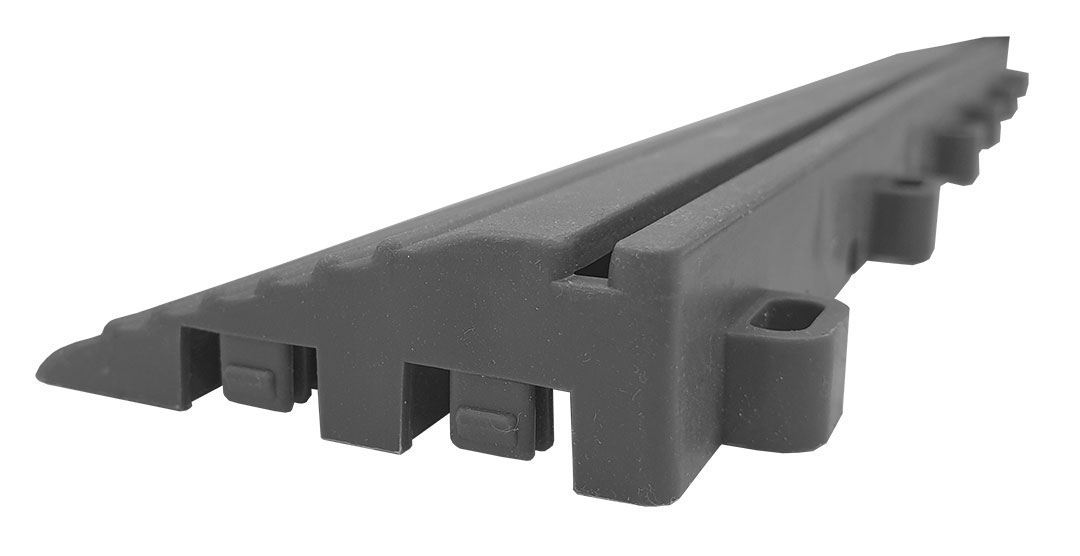
Align the front edge of a ramp carefully against the threshold line and then clip on the MotoVent Tile starting from the centre point and working your way left to right. The MotoVent Ramps or Edges are the same width as the main MotoVent tiles where you would require one edge per tile.
Make sure the MotoVent Tile is laid down correctly where they should be laid from the open of the space, starting with the flat edge bottom and on the left hand side (see image below).
Stage 3 - Continue laying tiles
Continue laying the tiles to the side (eg the right) laying across one tile at a time until you reach the point where you have a gap smaller than a whole tile before meeting the garage wall.
Leave this gap and all subsequent ones. Making all tile cuts at the very end speeds up and simplifies laying the flooring.
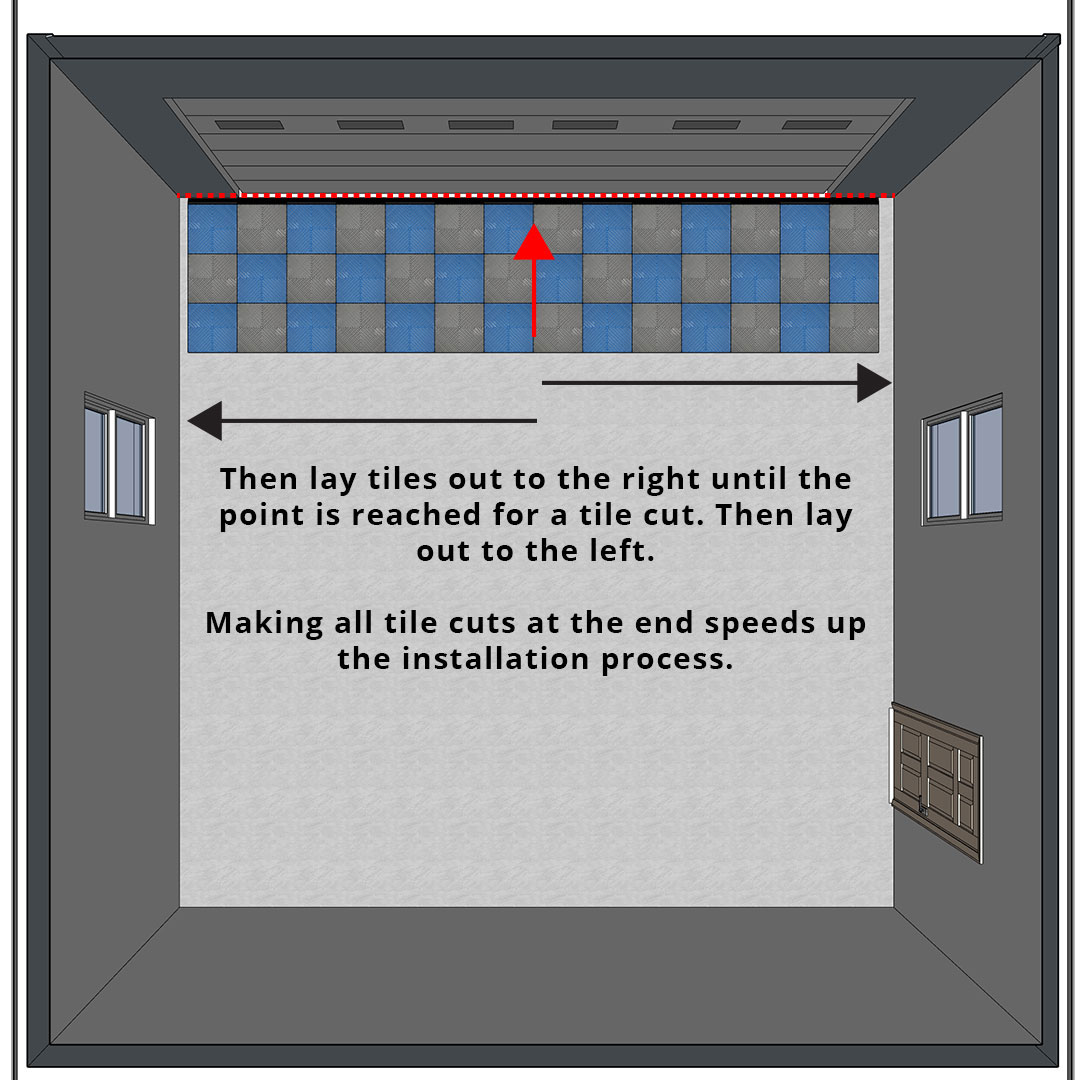
Now lay tiles out to the opposite wall of the garage, repeating the process above.
You should now have an equal gap on the left hand side and the right hand side before the walls.
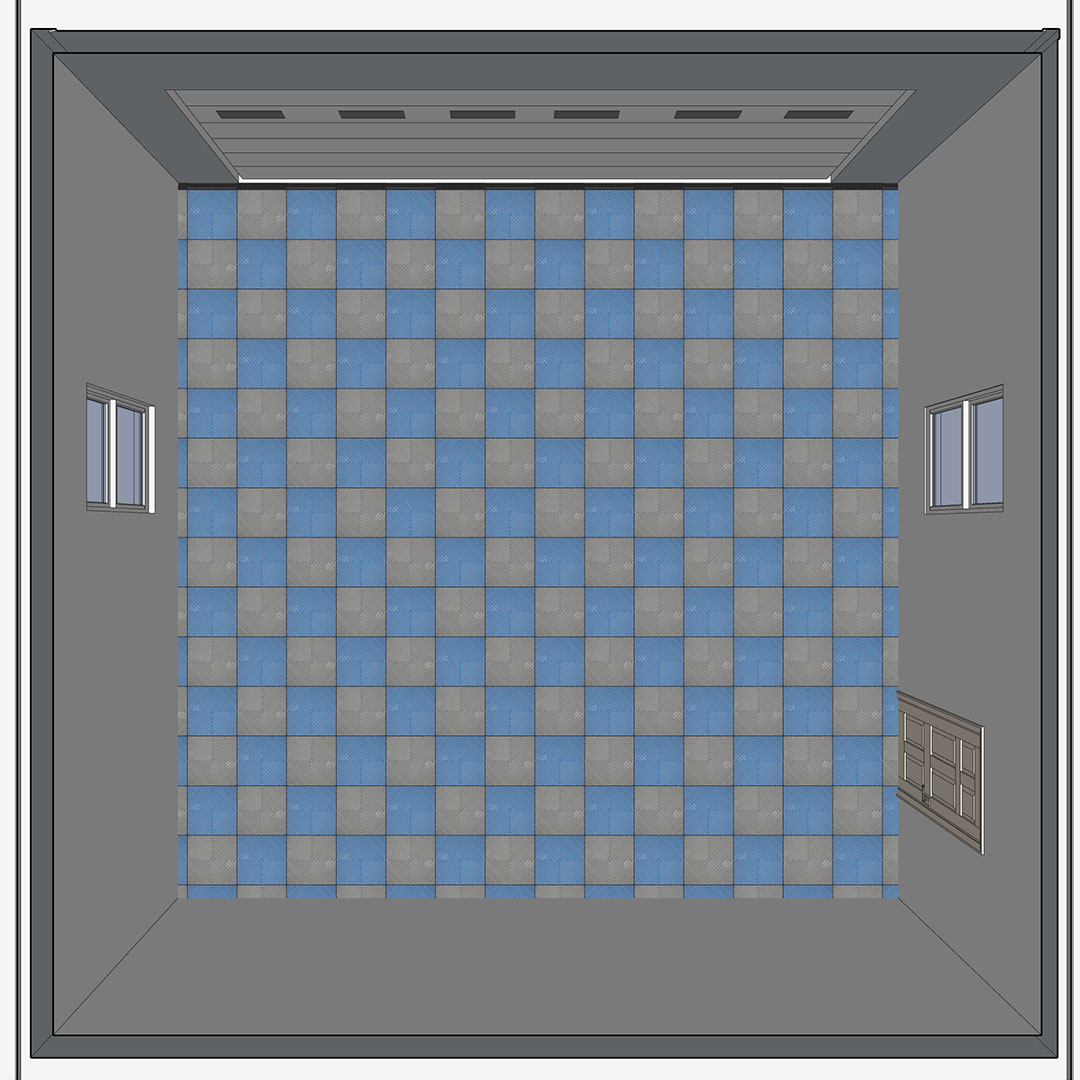
We suggest that you do a complete row across the width of your garage first, then work towards the rear of the garage in a left to right manner completing each row fully before commencing the next row, don`t forget to leave an equal gap on both sides for the cut tiles to be fitted to later.
Repeat this until all uncut tiles are laid and you have a small gap from the back row of tiles to the wall.
Stage 4 - Straighten the tile mat and align to ramp
You now have the opportunity to straighten the whole flooring you have assembled and realign if required.
Stage 5 - Perimeter tile cuts
You may now commence laying the cut tiles around the walls' perimeter.
Generally, the tiles that you cut to size from the left of the garage, the offcut can be used on the right hand side of the garage. As long as less than half the tile is being cut to size.
When measuring the tiles to cut we would suggest that you use three measuring points on each tile.
If cutting the tiles with a standard woodworking panel saw make sure it has a sharp blade. It is better to make several light scoring cuts rather than one heavy cut.
Consider creating a cardboard template from the boxes the tiles came in for any difficult shaped cuts.
We used a standard woodworking panel saw and jigsaw for all our cuts in a test installation.
Start at the front of the garage again. Measure and cut the first row tile on the left. Allow for a 5mm expansion gap between tiles and wall. Then repeat this process on the right hand side tile on the first row, don't forget you may be able to use the off cut from the left hand side
Repeat the process above for the next row back and continue until you get to the final row against the back wall of the garage.
Experience has taught us to lay the tiles in the left and right back corners last (ie. the tiles farthest from the first tile laid).
Measure, cut and fit all the other tiles on the back row then carefully measure, cut and fit the last two corner tiles.
That's the garage floor laid and ready for use.
After Care Advice: Cleaning, Maintenance and General Use
Regular light cleaning once a week is better than a heavy clean once a month. Brush or vacuum the floor first then sponge mop using a normal household, non-abrasive, floor cleaning detergent (neutral ph.) at a weak concentration. Use a damp mop rather than soaking the floor with a lot of water.
Catalytic converters and exhaust systems can get extremely hot so we recommend that you don't leave your vehicle parked and running on your Mototile floor as tiles could overheat and become displaced or damaged. Vehicles with a low ground clearance should be allowed to cool off before driving onto the tile floor to avoid deformation or damage to tiles.
Tyre marks and stamps
Tyres may, sooner or later, mark or stain the tile due to a chemical reaction between additives in the tyre compound and the plasticizer used in the production of the tile. This staining reaction can occur with most floor coverings including tiles, vinyl and paints.
To reduce the risk of tyre marking consider using Black or Dark Grey tiles in the areas where your wheels will sit. Should staining occur it would be less obvious or visible on darker coloured tiles.
We cannot predict if or when a tyre compound reaction may occur and do not consider tyre staining to be a defect in the product so we are unable to replace tyre stained tiles free of charge. We have tested acetone for removing tyre stains and found it to be very effective.

If you feel that your floor is likely to have staining regularly from tyres, chemicals or hair dyes etc. we have had some success and recommend the Floor Cleaner R1000 by Dr. Schutz. It cleans, protects and adds safety to your flooring in one step. Enhances the anti-slip properties, creating a water-soluble protective film. For more information and purchase options of this Floor Cleaner R1000 product click or go to: https://drschutz.co.uk/retail/floor-cleaner-r1000/
Please contact us for more information or help.
Pressure Points - Car Jacks
Ideally we do not recommend the use of car jacks on the MotoVent tiles and to remove them if the need of car jack is required.
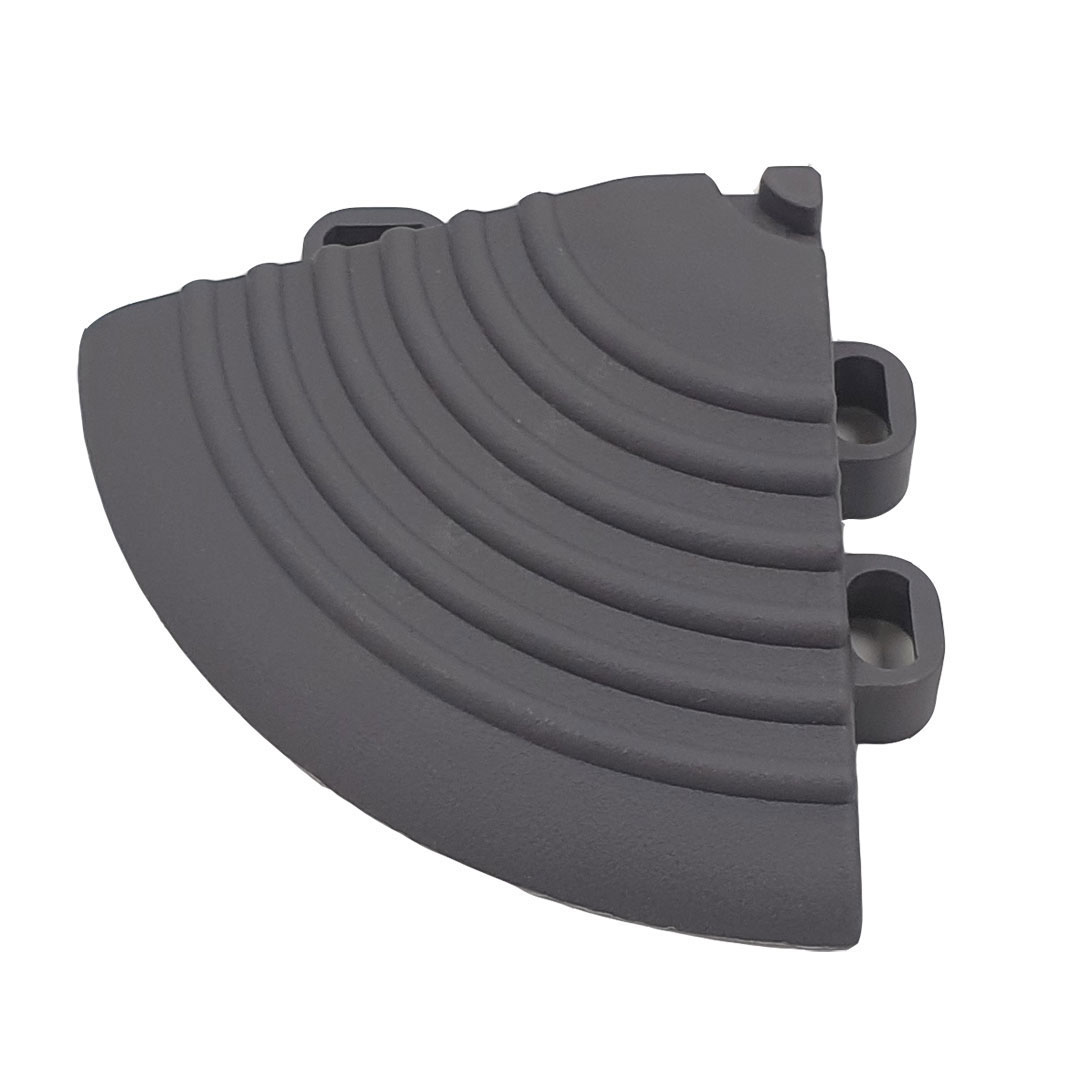
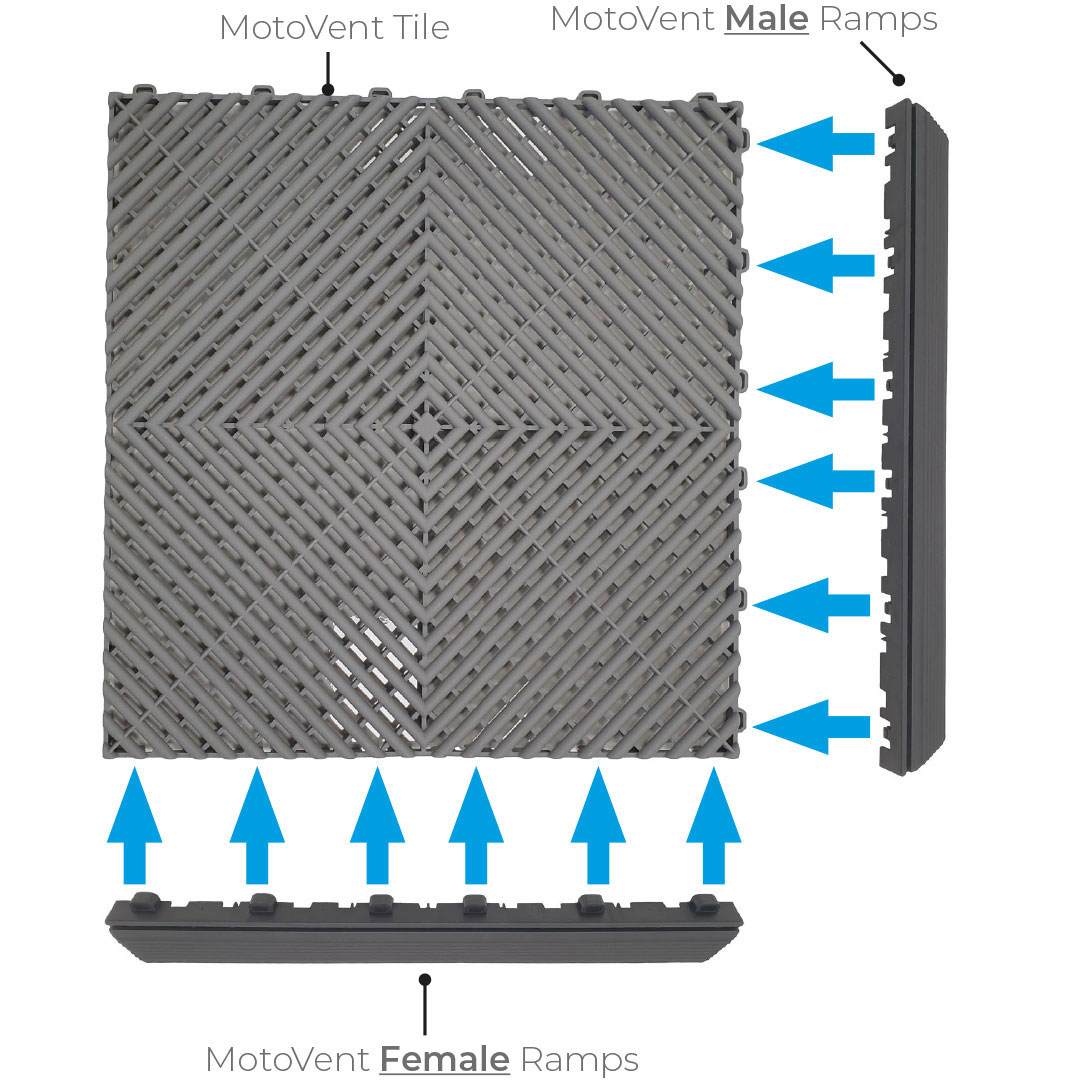
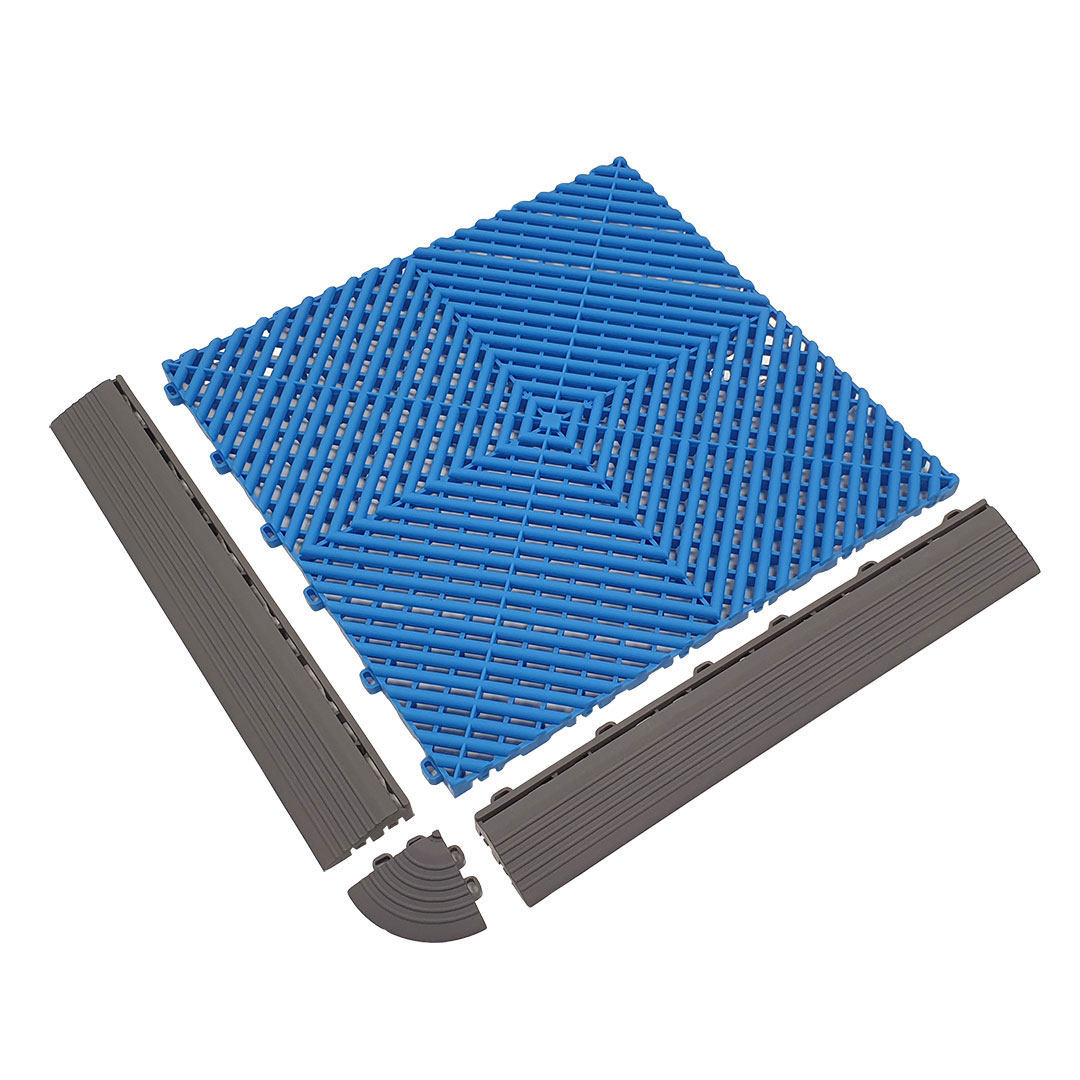
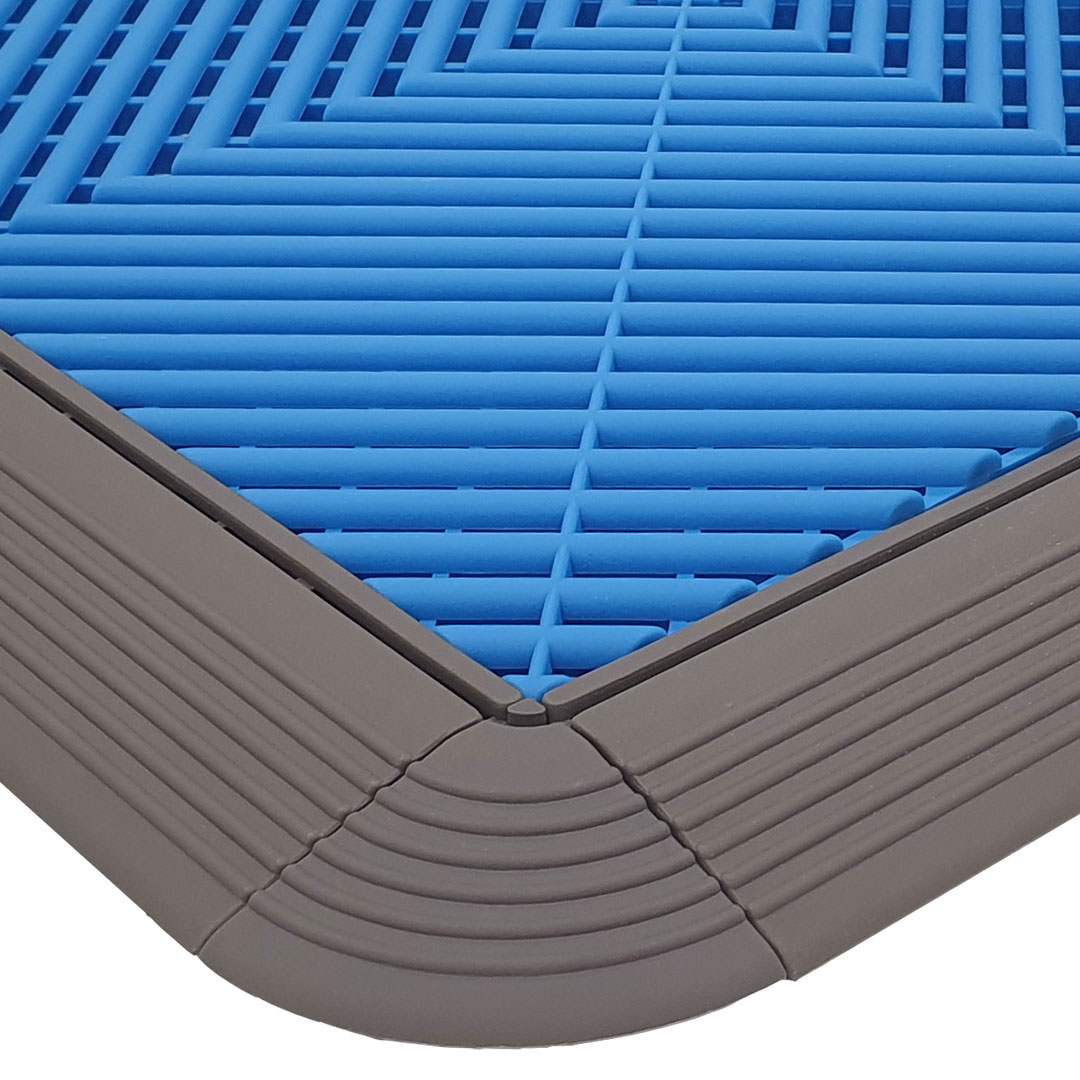
MotoVent Corner Ramps or Picture Frame layouts
For picture frame flooring designs there are 2 types of MotoVent Ramps / Edges and 1 type of Ramp / Edge Corner pieces:
1. MotoVent Male Ramps, fitted to the right-hand side and top edges.
2. MotoVent Female Ramps, fitted to the bottom flat edge and left side.
3. MotoVent Corner Ramps, fitted to the corners of your picture frame floor design.
Just click the button below to download and print out this MotoVent installation guideline.